Page Contents
Introduction
The project management module is a powerful and efficient tool used for managing and tracking customer briefs. This secure, web-based system enables salespeople to enter customer briefs from anywhere in the world, allowing projects to be fast-tracked for sample selection or R&D work by the technical team.
The module enables the management and sales team to track progress from customer briefs to R&D, sample submissions, customer feedback, resubmissions (if required), and wins. It also facilitates collaboration between team members, tracking product properties, and recording results from application technologists. Additionally, the module allows for the generation of required documents such as shipping documents, SDS, product specifications, labels and more.
The module is highly role-oriented and can be configured so that each person only sees the projects and tasks they are assigned. For instance, users can access Projects => My Tasks to view only their assigned tasks, providing a highly personalised and efficient view for their work.
Menu Bar
Below is the project menu followed by the functions.
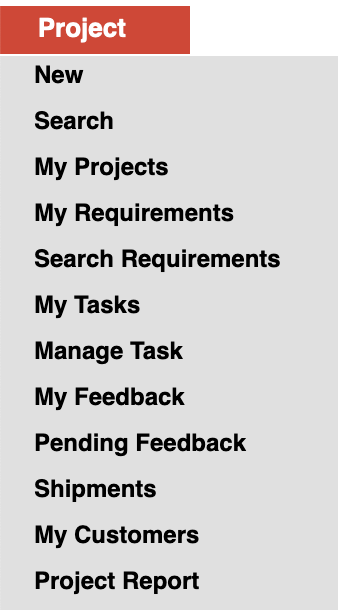
New – Create new project
Search – Search all projects
*My Projects – View only projects related to the user who has logged in
*My Requirements – View only requirements related to the user who has logged in
*Search Requirements – Search all requirements
My Tasks – View only tasks related to the user who has logged in
Manage Tasks – Use this screen to view and manage tasks. SCROLL DOWN to know more.
My Feedback – View only feedbacks related to the user who has logged in
Pending Feedback – View only feedbacks which need to be actioned upon
Shipments – View all items that have been shipped from projects
*My Customers – View only customers related to the user who has logged in.
Project Report – Gives you statistics of the projects for a particular period.
Note: If the user has view all permissions then the users can see all records but if the user has only view permission then the users can see only the records they are associated with.
For example:
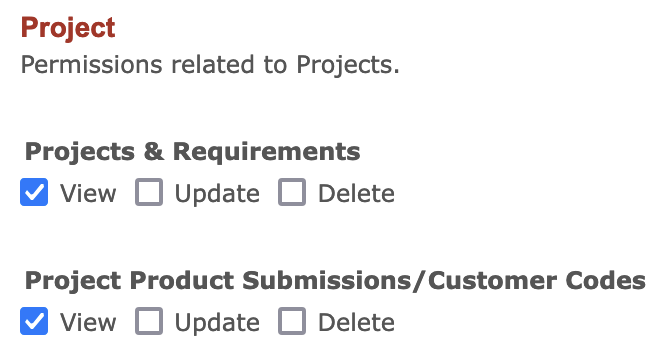
When the Users/Roles assigned have only Project “View” permission, projects are accessible to these users when they are directly associated with the project as –
- Account Manager
- Project Coordinator
- Assigned To
This ensures that sensitive information stays within the relevant team members.
Security Tags can be enabled to allow users associated with these tags be granted access to the respective modules. For more on security tags CLICK HERE
Work flow
Ruby supports multiple requirements for single project. For instance a flavoured milk project may have requirement for multiple flavours such as vanilla, chocolate and strawberry. Once a project is logged, an email is automatically sent to notify the relevant people to instigate action.
For each requirement, the project coordinator or account manager can assign specific tasks to appropriate team members, which again triggers an email notification. Tasks types could be library selection, application, creation, etc. These task types can easily be customised for your organisation at the software implementation stage.
The Feedback feature allows account managers to record/track feedback on each submission – e.g. rework required, lost the brief or wins.
Every project, requirement and task can be tracked through a status field. Example of project statuses are new, awaiting feedback, closed, etc. You can also configure the project module to automatically change status based on work flow. For instance when a sample is submitted against a requirement the project status may be automatically set to awaiting feedback.
Note: This page is also a guide on how to use Global Options. In Ruby, Global Options is where you can configure your instance to suit your company’s needs. Usually a very limited number of people have access to this screen.
You will see a red line to the left when there are some instructions related to the entire instance.
All the data that needs to be captured can be customised according to your organisations needs. Some of the common properties and how to configure them are explained below (image followed by explanation).
Creating a new project
- To create a new project go to Project => New
Best practice is for the account manager (sales manager) to create a new project.

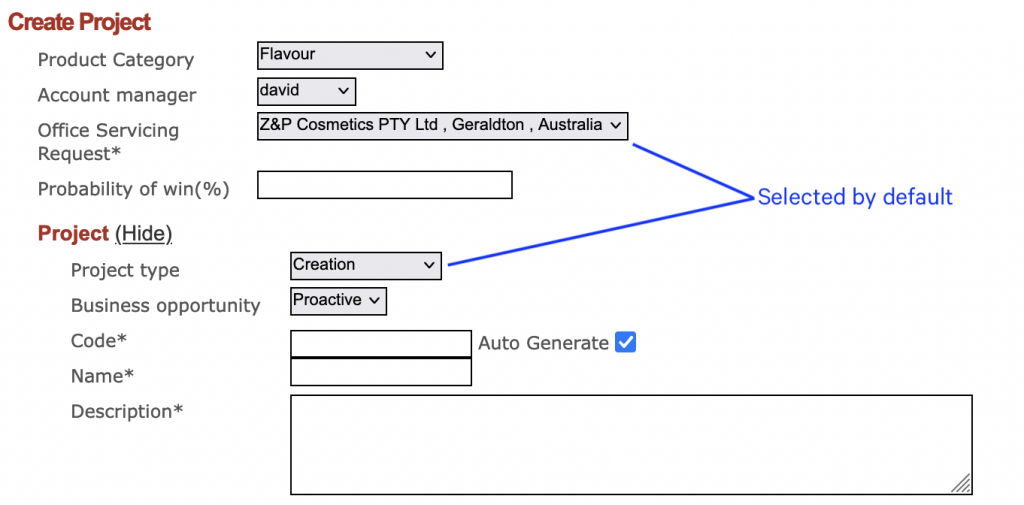
Project Category
First select the project category as this determines the fields that will be displayed. Meaning if the project is a flavour project then only flavour related fields will be visible.
These categories are pre loaded by Ruby.
For the project category you can configure what the default selection should be. For instance if your company manufactures only flavours then you can configure the system to always select flavour.
- For all default settings go to Configure => Global Options => Project => Default Project Settings.
Account Manager
- To configure account managers go to Configure => Global Options => General => User Lists => Account Manager
User Lists: are used to configure a list of users for various activities, such as assigned to, approved by, email notifications and a lot more.
All user lists can be configured under Configure => Global Options => General => User Lists
The project module can also be setup to allow third party agents to directly enter their projects with restricted access.
Office Serving Request
If you have multiple offices, you would need to choose the office that would be servicing this project. If you have multiple offices but only one office servicing all the projects then you can set it as the default, thereby making project entry faster.
My Organisation: This is where you can enter all details regarding your organisation (such as address, contact details, tin number, gst number, trading name, etc. ).
To enter your organisations details go to Configure => Global Options => General => My Organizations => Click edit or create new
Probability of Win
Enter the probability of win in percentage.
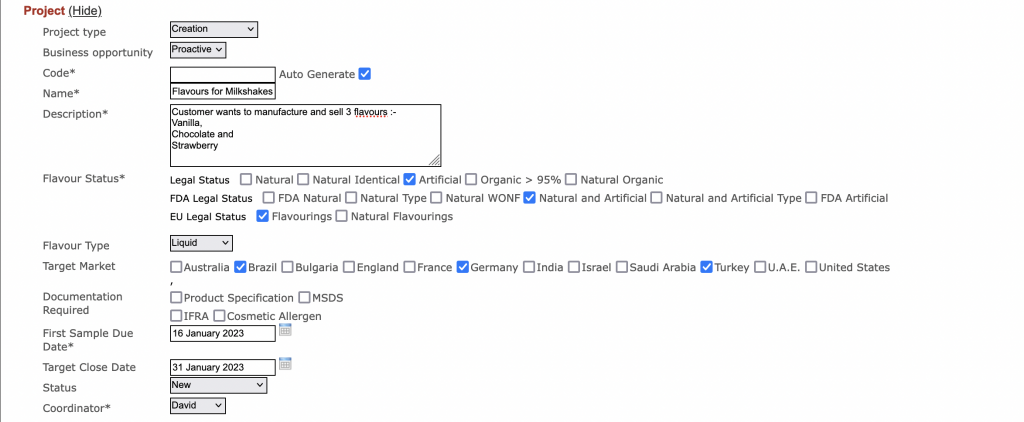
Project Type
Project type is user configurable i.e. your company can decide how the projects should be classified. For example you can have project types such as library selection, creation, matching, etc.
- To configure project types go to Configure => Global Options => Project => Project Types
Business Opportunity
Business opportunity can be customised according to your organisations needs. For example you can have business opportunities as proactive, respond, defend, etc.
- To configure business opportunities go to Configure => Global Options => Project => Business Opportunities
Code
Project code is a unique code to identify the projects. This can be entered manually or generated automatically.
- To configure auto generation of codes go to Configure => Global Options => General => Code Generation Settings => Project
Code Generation Settings: Ruby allows you to generate codes as per your organisations requirement. Codes can be generated for projects, products, raw materials, purchase orders, sales orders, customers, suppliers and a lot more.
To configure auto generation of codes go to Configure => Global Options => General => Code Generation Settings
Make sure to create a code generation option for each type.
The project module can also be configured so that each account manager can have a unique project code generated for his/her projects.
Name
The account manager needs to enter a descriptive (easily identifiable) name for the project.
Description
Elaborate on the project requirement.
Flavour Status
Select the legal statuses that the final product need to comply with.
Flavour Type
Select the flavour type from the drop down.
- To configure flavour types go to Configure => Global Options => Project => Flavour Types
Target Market
Select the countries you want to target with this product.
Countries: The list of countries are used across various screens.
To configure countries go to Configure => Global Options => General => Countries
Documentation Required
Select the documentation that needs to be submitted along with the samples.
- To configure this list go to Configure => Global Options => Project => Documents Required
First Sample Due Date
Enter the date on which the first sample needs to be submitted.
Target Close Date
Enter the date by which the project needs to be closed.
Status
Select the status of the project from the drop down.
- To configure the project status go to Configure => Global Options => Project => Project Status Options
- To configure the project module to automatically change status based on work flow got to Configure => Global Options => Project => Auto Status Change Rules
Coordinator
Select the project coordinator from the drop down.
- To configure project coordinators go to Configure => Global Options => General => User Lists => Project Coordinator
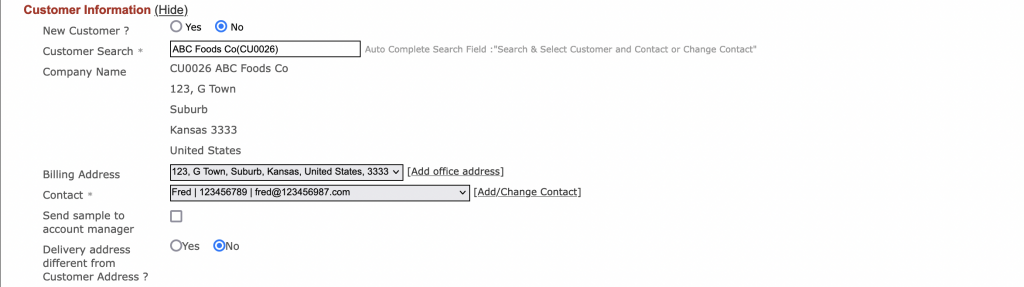
Customer Information
Enter the customer information here.
New customers: You can select an existing customer or create a new one on the fly. To create a new customer select yes, under new customer. This option is also available in various other screens.

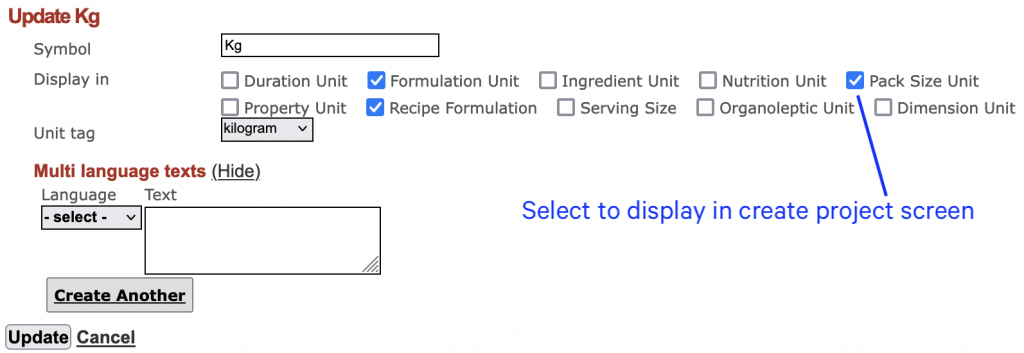
Potential Volume Per Annum
Enter the quantity expected to be sold in one year along with the unit.
Units: These units are used across Ruby and is better to configure them during implementation.
To configure units go to Configure => Global Options => General => Units
For units to appear in project screen select pack size unit as shown below.
Average Target Price for Project
Enter the average target price expected to be sold in one year along with the currency.
Currency: Currencies are used across Ruby and is better to configure them during implementation.
To configure currencies go to Configure => Global Options => General => Currencies

No Application Required
Check this box if no application (base for the flavour) is required to be sent to the customer.
Application
Enter the application (usage) of the product.
Target Dosage
This is the max dosage (in percentage) that can be used in the finished product.
Base Provided by Customer
Check this box if the customer is providing the base for R&D, testing, sampling, etc.
Base Details and Instructions
Enter any details regarding the base such as usage, quantity, etc.
Solubility
You can select one or more substances in which the flavour will be soluble.
Solvents: Solvents are used across the instance.
To configure solvents go to Configure => Global Options => Product => Solvents
pH Requirement
Enter the pH requirement for the flavour or fragrance.
Heat Stability Required ?
Select yes or no based on the heat stability requirement.
This field is controlled based the selected project category:
- It is shown for Flavour, Pigment, and Food/Food Ingredient
- It is hidden for Fragrance and Cosmetics
Requirements
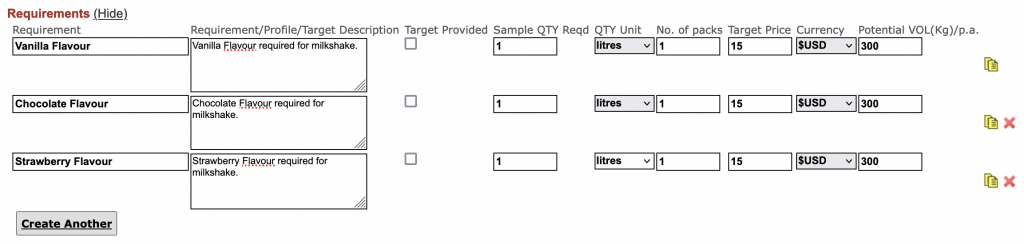
Enter the various requirements for this project as shown above. Each requirement becomes a separate item in the requirement tab and tracker tab.

Regulatory Rules
Select any rules that product needs to comply with.

Notify
Select the people that need to be notified regarding a new project creation or update in an existing project.
Notify: This notification feature is available across screens and tabs. Any create or update will trigger a notification email to the selected users.
To edit the list of users go to Configure => Global Options => General => User Lists
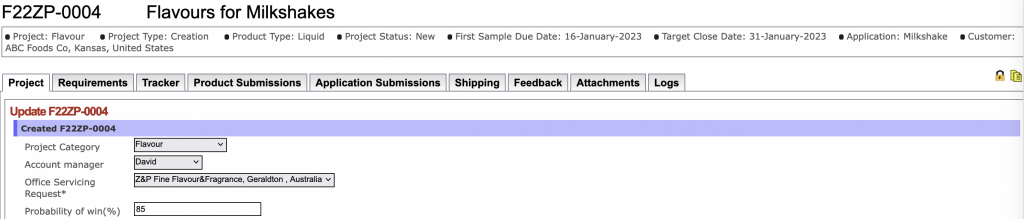
Once you have entered all the details, click create and the screen will update as shown above. The product code and name is on top, followed by a summary of key information in bullets (horizontal).
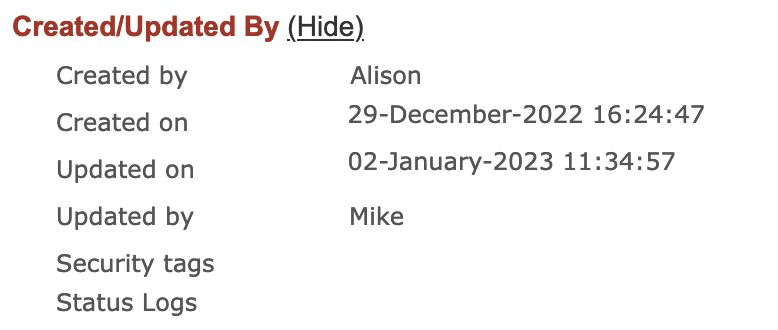
A created by section also appears at the bottom of the page, as shown above.
Created/Updated By: This section appears at the bottom of most screens and tabs.
It displays information on who has created and updated the project, product, document, invoice, etc. This enables users to track changes that have been made.
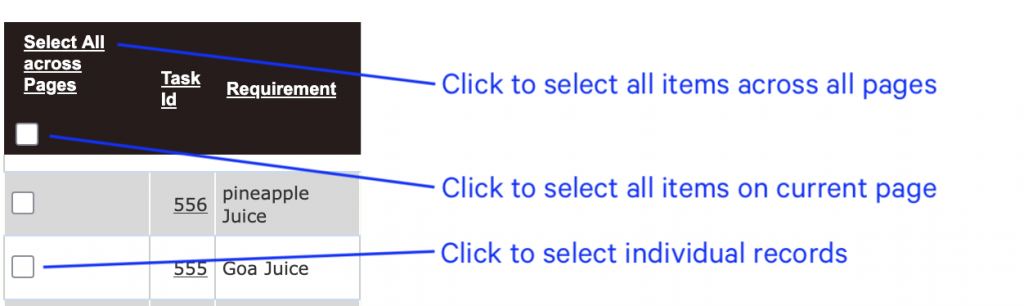
Multi select
Before moving on to the next tab let us see how multi select works. This is available in the requirements, tracker, product submissions and application submissions tab.
- To select/un select all items across multiple pages click “Select All across Pages”.
- To select/un select all items on the current page click the check box right on top.
- You can also select/un select individual records by clicking on the box in each line item.
Requirements tab
This tab displays the 3 requirements entered while creating the project.
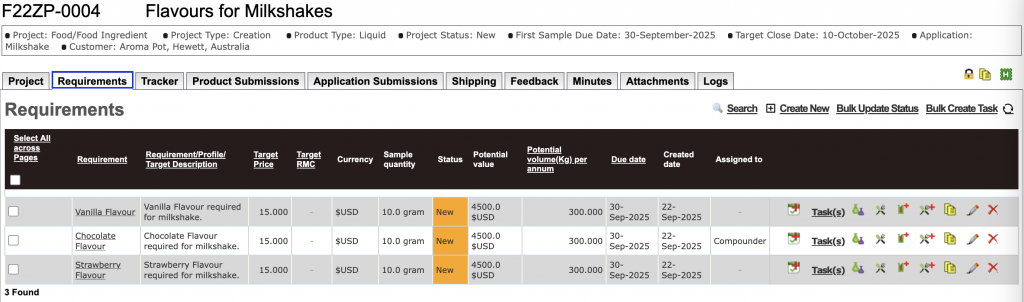
Icons
New Task – Click on the first icon to create a new task.
Task(s) – will take you to the my task page where you will see only tasks assigned to you.
Open Product Development – opens all the product developments related to this requirement.
Open Application Development – opens all the application developments related to this requirement.
New Product Development – Click to create a new product development for this requirement.
New Application Development – Click to create a new application development for this requirement.
The following 3 icons are present throughout the instance
Copy – Click to make a copy of the item.
Edit – Click to edit the item.
Delete – Click to delete the item.
Click on new task to add a task for the particular requirement. You will see the below screen.
Requirement
This is the name of the requirement that was entered in the previous screen.
Feedback
This field auto populates based on the feedbacks entered in the feedback tab (explained below).
Assigned Date
Select the date on which the task is being assigned.
Item Code(s)
From the drop down select the existing products (if any) that you are using for this requirement. You can select multiple products.
Task Type
Select the type of task from the drop down.
- To configure task types go to Configure => Global Options => Project => Task Types
Assigned To
Select the person to whom this task is being assigned to.
- To configure the assigned to list go to Configure => Global Options => General => User Lists => Tracker Assigned To
Action
Enter a brief on what the task is about.
Status
Select the status of the task.
- To configure the status go to Configure => Global Options => Project => Project Status Options
Priority
Select the priority from the drop down.
- To configure this list go to Configure => Global Options => Project => Task Priorities
Start Date
This is the date on the which the assigned to person has to start working on the task.
Due Date
This is the date by which the task needs to be completed and submitted.
Note
Enter any notes or instructions that the assigned to person needs to follow.
Notify
Select the users you want to notify regarding the requirement.
Once you have entered the required detail, click add.
Default project tasks
Ruby allows you to assign tasks to users by default. In other words, while creating a requirement, this requirement gets assigned to a user by default. This works based on project type.
- Go to Configure => Global Options => Projects => Default Project Tasks
Click create new and select the desired options.
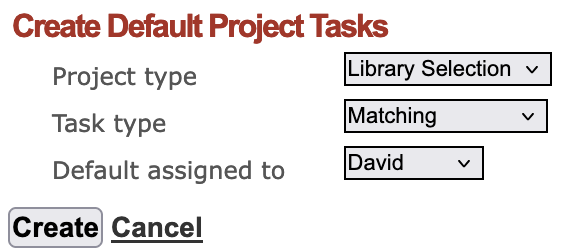
Use Case 1 – While creating a new requirement
In the above image, if the project type is library selection, then while creating a requirement the corresponding task will be of task type matching and will be assigned to David.
Use Case 2 – While creating a new project
While creating a new project you can enter multiple requirements.
Each requirement becomes a separate item in the requirement tab and tracker tab. Default project tasks will assign users to each requirement created at this stage.
Note: If multiple default configurations are configured for the same project type, then multiple tasks will be created for the same requirement.
Bulk Update
You can multi select items and use the following options

Bulk Update Status – Select all the required items and then click “Bulk Update Status”. Select the required status and click update.

Bulk Create Task – Select all the required items and then click “Bulk Create Task”. Fill in the required details and click create.
Note: This operation would create new tasks in the tracker tab.
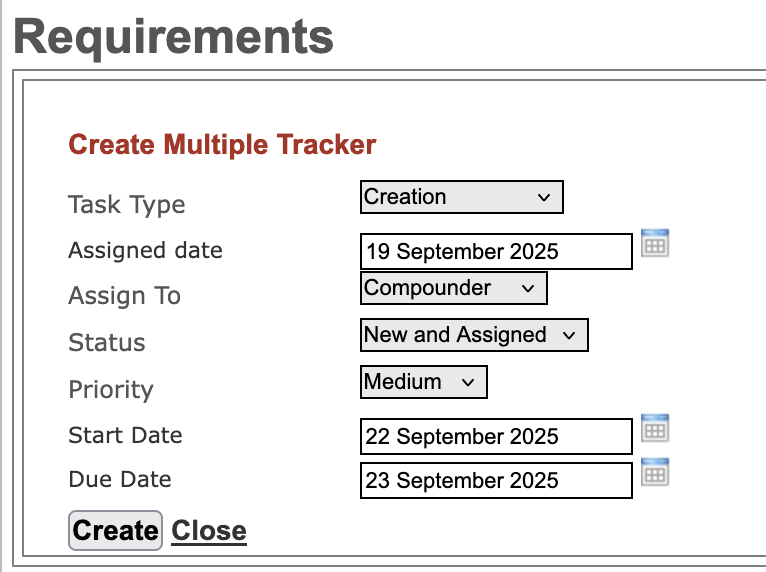
Task Type – Select the task type.
Assigned date – Select the date on which you are assigning the task.
Assign To – Select the person that you want to assign all the tasks to.
Status – Select the current status of the tasks.
Priority – Select the priority.
Start Date – Select the start date.
Due Date – Select the due date.
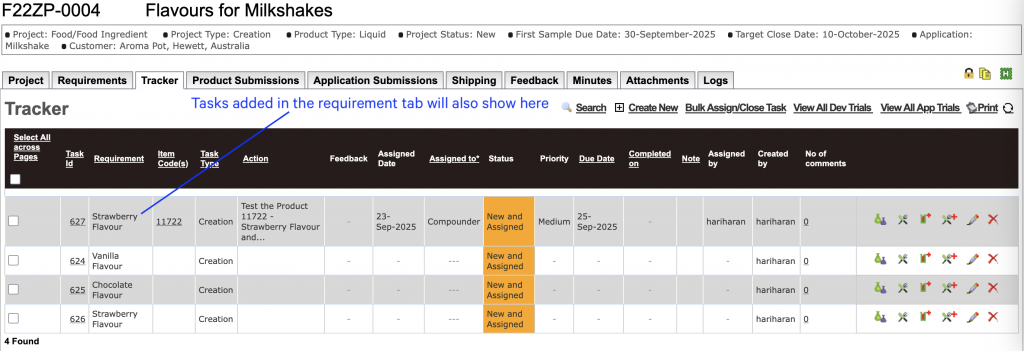
This will then show in the tracker tab (As shown below).
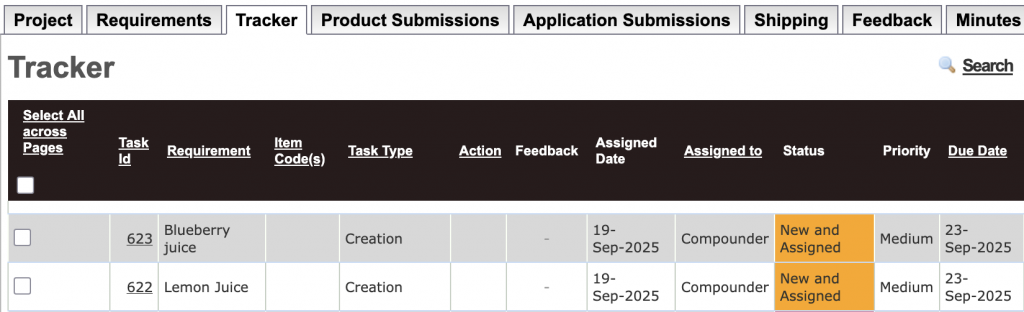
Tracker tab
Each requirement may involve one or more tasks that need to be assigned. The tracker tab shown below is used to create the relevant tasks, assign them to appropriate team members and track the status of each requirement.
The tracker also allows account managers or coordinators to assign and schedule tasks to technical members through an advanced planning interface. When an assignee is selected it determines all the dates the assignee has tasks in the next 30 days. Further it also shows all the active tasks for the user hence allowing the project coordinator to accurately plan and assign tasks and dates.
The system also allows you to create tasks without associating it with a requirement. Each user can also print his or her job sheet which is a hard copy of all the tasks to be worked upon in the project.
When a product sample is submitted and the customer has provided a feedback you can create a task to address the feedback. You can also create multiple tasks such as creation, document generation, etc and assign it to one or more personal.
Updating tasks
Edit any task and you will see the below section.
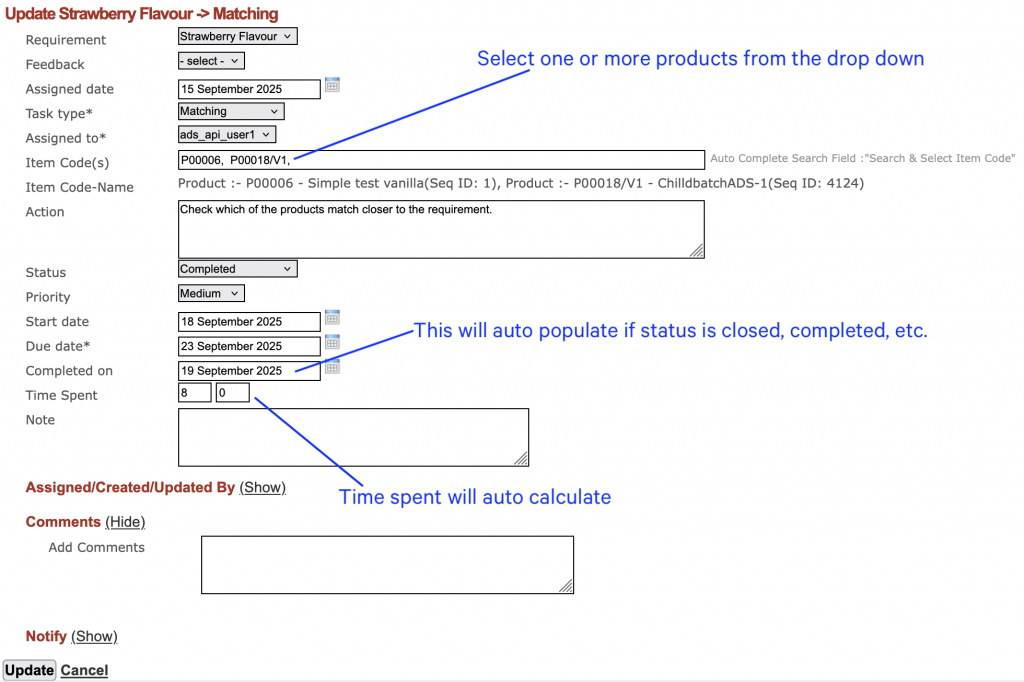
Requirement – This would show the requirement that this task is associated to.
Feedback –
Assigned date – Select the date on which you are assigning the task. On changing assigned to, this field would auto populate with the current date.
Task type – Select the task type from the drop down.
Assigned to – Select the user from the drop down.
Item Code(s) – Select one or more products from the drop down.
Action – Enter any notes on what needs to be done.
Status – Select the status from the drop down.
Priority – Select the priority from the drop down.
Start date – Enter a start date for the task.
Due date – Enter a due date for the task.
Completed on – This will auto populate with the current date if the above status is closed, completed, etc.
Time Spent – This will auto fill based on the start date and completed on date. By default it will take 8 hours per day and this will not include Saturday and Sunday.
- To enable time spent go to Configure => Global Options => Projects => Default Project Settings => Auto calculate time spent on tracker close
Bulk Update
You can multi select items and use the following options.

Bulk Assign/Close Task – This will allow you to assign or close multiple tasks in one shot.
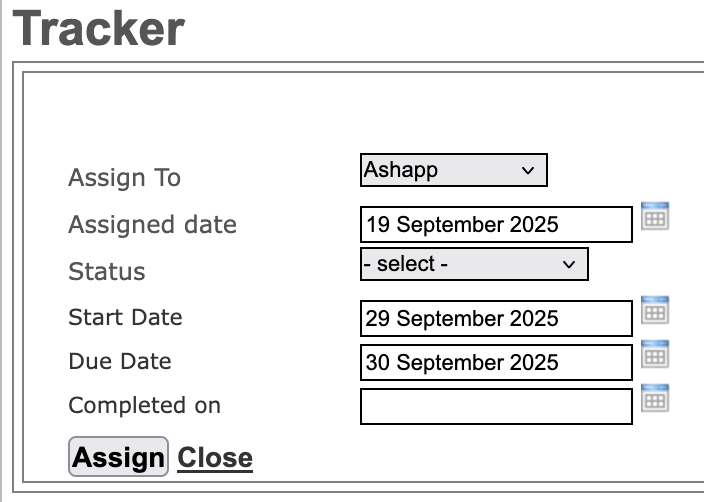
Assign To – Select the person that you want to assign all the tasks to.
Assigned date – This will auto update with the current date.
Status – Select the current status of the tasks.
Start Date – Select the start date.
Due Date – Select the due date.
Priority – Select the priority.
Completed on – This will auto fill with the current date if you select a status such as closed, completed, etc.
Print – Print multiple items in a single Project Tracker Template.
- To configure product submission templates go to Configure => Global Options => Templates => Project Tracker Template
Product submission tab
When a sample is ready to be shipped, the details are entered in this tab. Click on add sample and you will see the below screen.
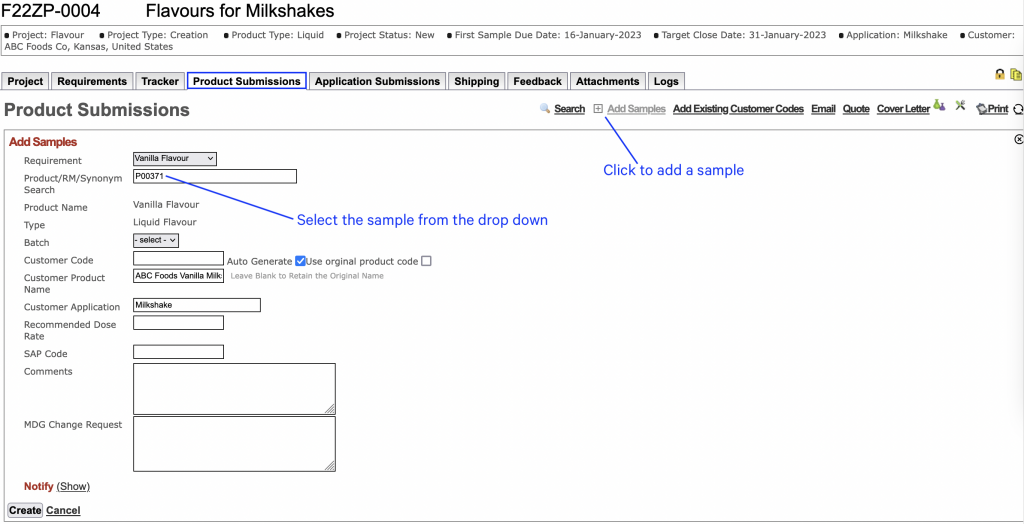
Requirement
Select the requirement for which the sample is being shipped.
Product/RM/Synonym Search
From the drop down select the item that is going to be sent as a sample. You can search by product name, raw material name or synonym.
Batch
Select the batch from which the sample is being sent.
Customer Code
You can choose to use the original product code or enter a code or auto generate the customer code.
Customer Code: is for customers who are concerned about confidentiality and they don’t want others to know what they are purchasing.
This is a code which is unique to a customer. A single product can have multiple customer codes. Each of these codes are associated to one customer.
For more on customer codes CLICK HERE.
Customer Product Name
You can enter a new name for this product or leave it blank to retain the original name.
Customer Product Name: Similar to customer code this name will be unique to each customer.
Customer Application
This is automatically picked up from the project tab.
Recommended Dose Rate
This is the percentage of flavour that is recommended for use in the finished product.
Click create and you will see the below screen.

A product submission has been created for the requirement – Vanilla Flavour, with customer code – CC00092, product name – ABC Foods Vanilla Milkshake and product used – P00371.
Note: You may also submit an existing customer code to this project. The settings under global options should be configured to allow customer codes to be submitted across projects.
Icons
Price List – Click to create or edit prices for this item.
Generate SDS – Click to generate safety data sheets.
Product Specification – Click to print product specification document.
Print Label – Click to print labels.
Documents Menu – This will take you to documentation tab of the product.
Price list
Once a product has been submitted you can create a price list for the item. Click the price list icon and you will see the section shown below.

Click create new and you will see the section shown below.
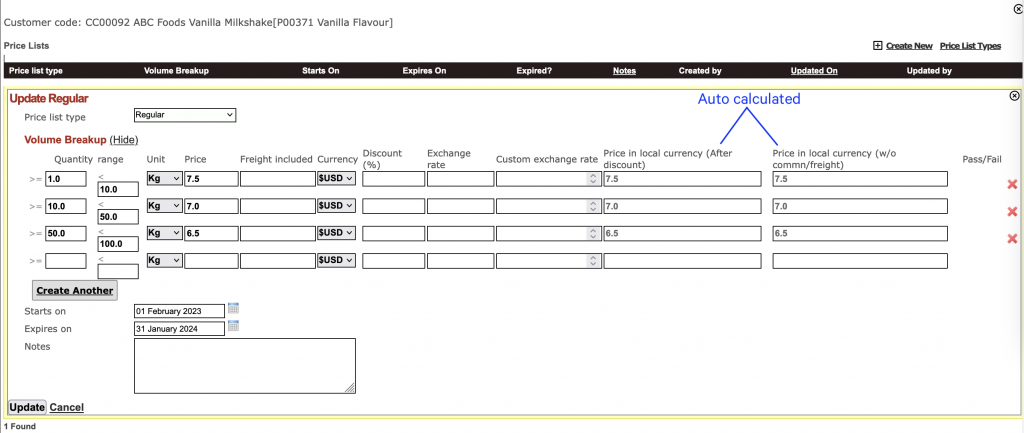
Price List Type
Select the the type of price list.
- To configure price list types go to Configure => Global Options => Product => Price List Types
Volume Breakup
Here you can enter the various prices based on the quantity. The last 2 columns will auto populate on creating the price list.
You can also enter a start and end date for these prices.
Note: These price lists can be viewed in project menu AND Customer => Price List
For more on price lists CLICK HERE.
Bulk Update
You can multi select items and use the following options.

Quote – To quote for multiple items in a single quotation.
Quick Print – Used to print multiple documents for multiple line items.
Print – Print multiple items in a single Product Submission Template.
- To configure product submission templates go to Configure => Global Options => Templates => Product Submission Template
Product Submission Restrictions
Product Submissions can now be restricted if it does not meet the desired rating OR does not have profile descriptors.
- To configure this go to Configure => Global Options => Project => Default Project Settings
Click edit and scroll down to “Product/Application submission settings”.
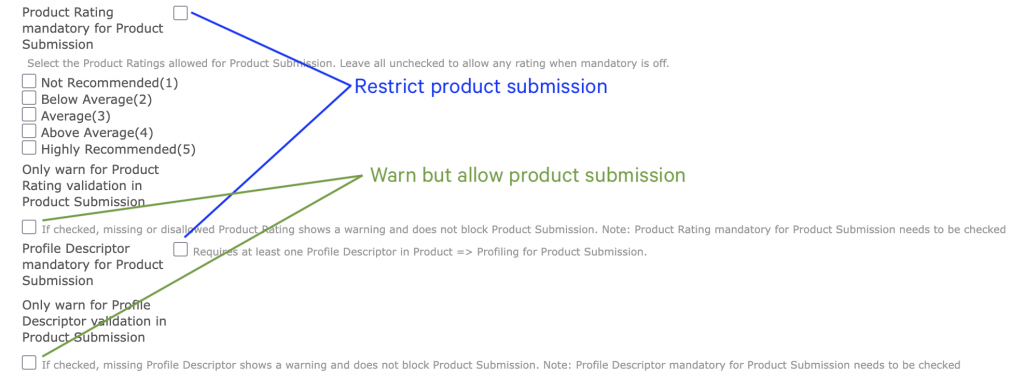
You can either restrict the submission OR just show a warning.
- To configure the ratings go to Configure => Global Options => Application => Score Range
Application submission tab
Once application related tasks have been completed, the details of the application submissions are recorded and tracked in this tab. An application submission tracks the application developed with the submitted flavour or fragrance.
Click add std test.
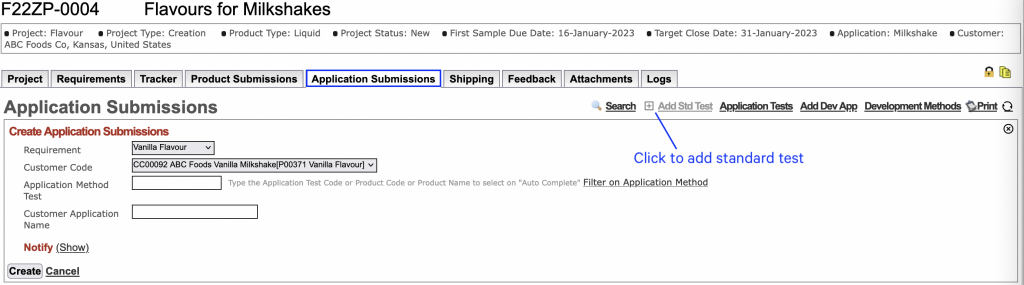
You can submit a standard application trial or a development application trial to your project.
Requirement
Select the requirement for which the sample is being shipped.
Customer Code
Select the product from the drop down.
Application Method Test
Type the application test code, product code or product name and select from the drop down.
Filter on Application Method – Further you can filter on a standard application method to restrict the search to find the right application quickly.
Customer Application Name
Enter a name for the application to be printed on labels and documents. Leave this blank and the system will pick up the original application trial name.
Bulk Update
You can multi select items and use the following options.

Print – Print multiple items in a single Application Submission Template.
- To configure product submission templates go to Configure => Global Options => Templates => Application Submission Template
Application Submission Restrictions
Application Submissions can now be restricted if it does not meet the desired rating.
- To configure this go to Configure => Global Options => Project => Default Project Settings
Click edit and scroll down to “Product/Application submission settings”.
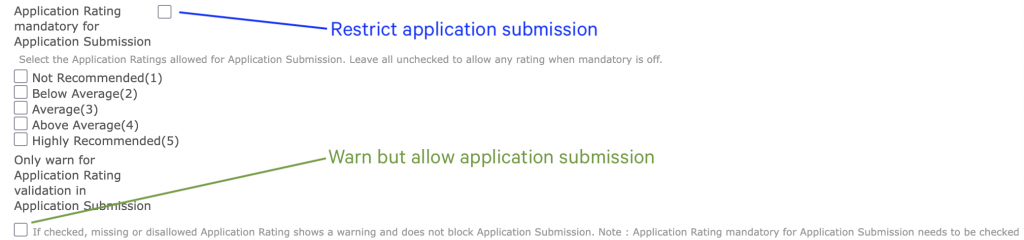
You can either restrict the submission OR just show a warning.
- To configure the ratings go to Configure => Global Options => Application => Score Range
Shipping tab
When samples are ready to be shipped, you can use this tab to enter the shipping details and generate shipping documents. You can ship multiple times and track the details of shipping along with freight information accurately. It also enables the account manager to view samples shipment information and follow up if there is delay in delivery of the samples.
Best practice is to use quick ship. For this you need the select the items to ship from the product submission tab AND application submission tab.
Note: You can use the multi select feature to select multiple items.
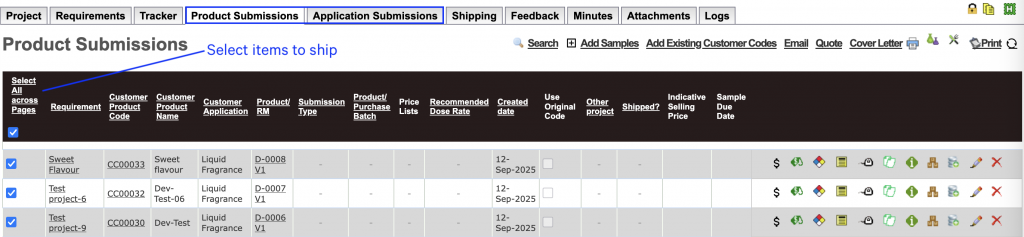
Once you have selected the items go to the shipping tab and click the quick ship (green ship) icon.
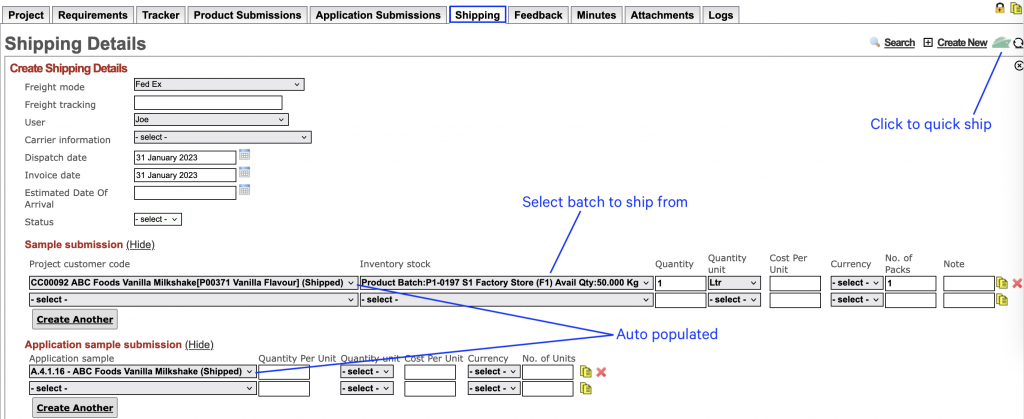
You will see that the selected items have auto populated along with the details. This quickens the process.
From inventory stock select the batch you want to ship from. But if the batch is already selected in the submission tab and stock is available it will auto select the batch.
Enter the required details and click create to ship.
Note: Only on shipping will the stock get deducted from the batch.
Freight Mode
Select the mode of transport from the drop down, such as road, rail, flight, private courier, etc.
- To configure these options go to Configure => Global Options => Project => Freight Modes
Freight Tracking
This is the tracking number of the parcel typically given by the courier company.
User
Select the user who is in charge of shipping the product.
Carrier Information
Carrier information is a list of carrier companies in your region.
To configure carriers go to Configure => Global Options => Orders => Carrier Information
Dispatch Date
Select the date on which the sample will be shipped.
Invoice Date
Select the date of invoice, if any.
Estimated Date Of Arrival
Select the date on which the sample is expected to be delivered.

If you are not using the quick ship feature, you can use sample submission section to add the items that are going to be shipped. Click create another to add multiple items.
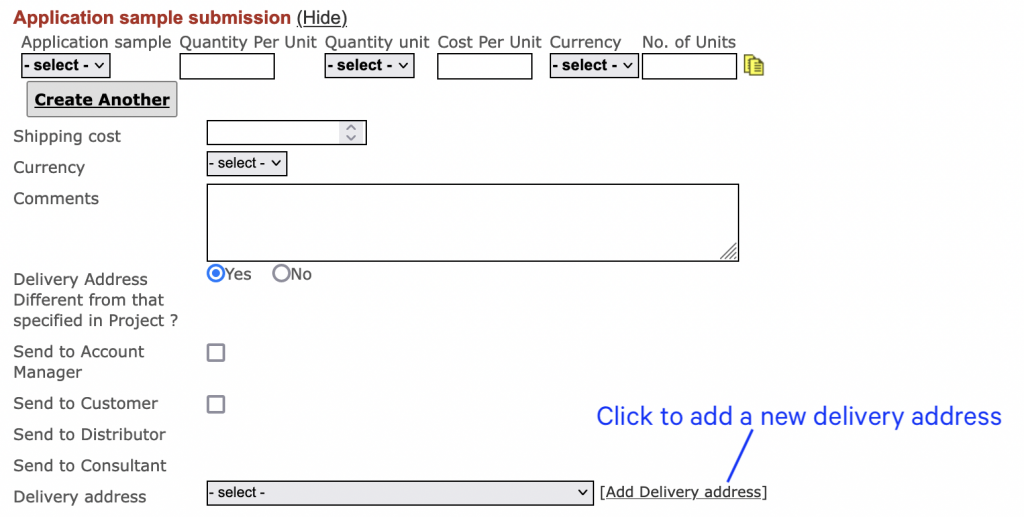
Shipping Cost
Enter the cost of transport.
Currency
Select the currency of the shipping cost.
Delivery Address
If the delivery address is different from the one entered in the project tab then you can select a different address or create a new one.
Additional Information
You can also capture additional information related to shipping. This can be configured according to your organisations needs. An example is shown below.
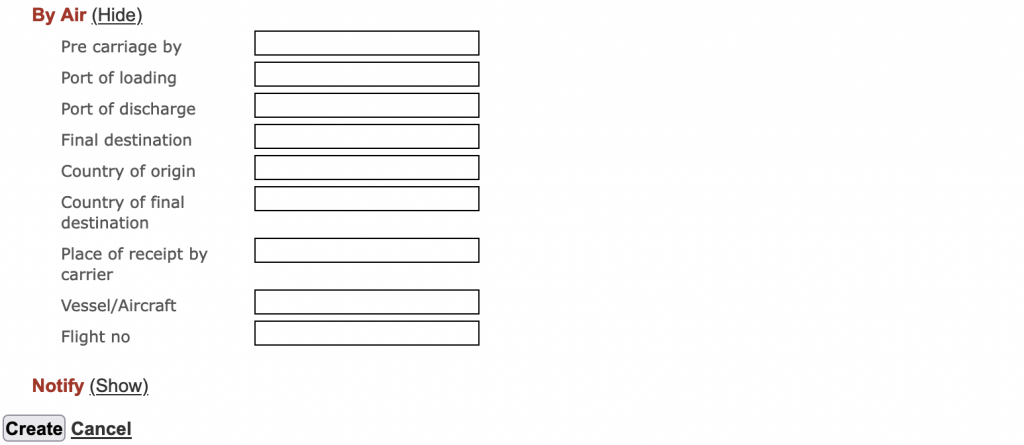
Click create to create the shipping record.
Note: If inventory tracking is enabled then the inventory module will auto subtract shipped quantities from the main inventory.
Shipping Restrictions
Shipping can now be restricted if the product or application does not have a rating.
- To configure this go to Configure => Global Options => Project => Default Project Settings
Click edit and scroll down to “Product/Application submission settings”.

Feedback tab
There are 2 features available in this tab. One is to enter the customers feedback for the sample or application and the other is to mark sample or application as win.

Click create new and select the sample or application that has been submitted. Enter the required details and click create/update.
Customer Code
Select the sample from the drop down.
Application Trial
Select the application from the drop down.
Feedback
Entering a feedback is mandatory.
Action Required ?
Select yes or no based on the feedback.
Action
Enter a brief on the action to be taken
Due Date
This is the date by which you would need to respond to the feedback. This date would get updated in the requirements tab.
Market Rating
Select a rating from the drop down.
Win
Check this box if the customer is satisfied with the sample or application and no further work is required on it.
Order Received ?
Select yes or no.
Comments
Add any comments if required.
Attachments tab
Use this tab to upload and save any documents related to this project.
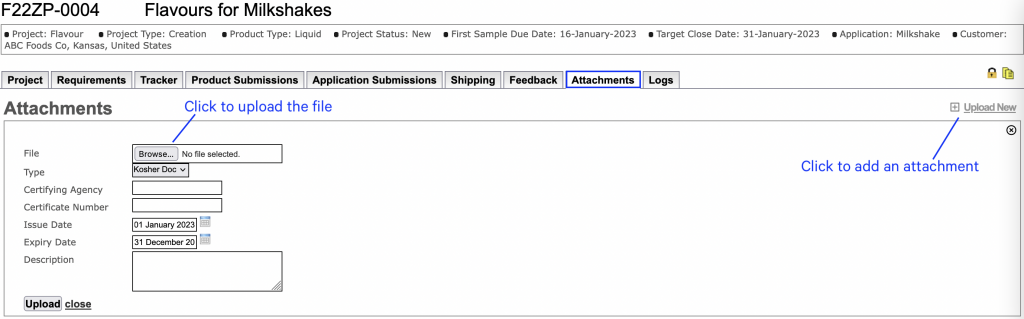
File
Click browse to select the file to upload.
Type
Select the type of file from the drop down.
- To configure the file type go to Configure => Global Options => Templates => Attachment Types
Certifying Agency
Enter the name of the agency who has issued the certificate.
Certificate Number
Enter the number of the certificate.
Issue Date and Expiry Date
Make sure to enter these dates so that Ruby can keep track of documents that are about to expire.
Click upload.
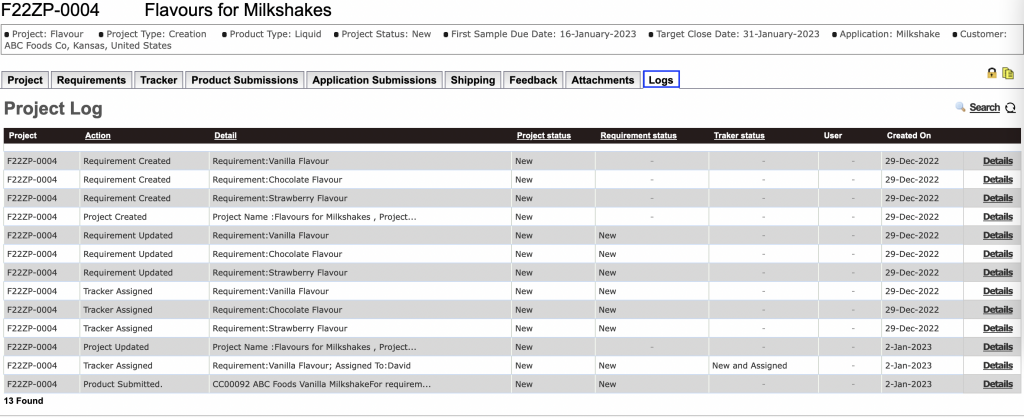
Logs tab
This tab is a read only, chronological record that tracks whats happening in the project. This is helpful for the account manager or project coordinator to quickly see the status of the project.
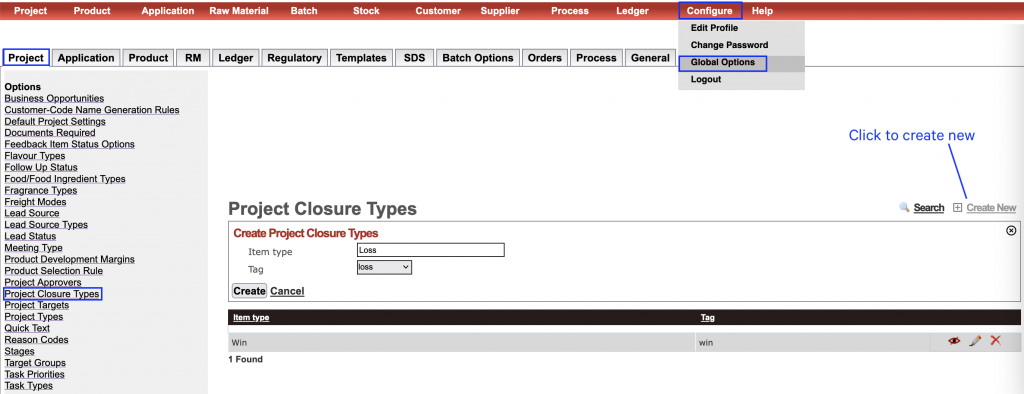
Closing projects
You have the option to close a project by specifying the closure type and reason code. This would help in tracking and searching closed projects.
Project Closure Types
- To configure project closure types go to Configure => Global Options => Project => Project Closure Types
Click create new.
Enter the item type and select the tag.
Click create.
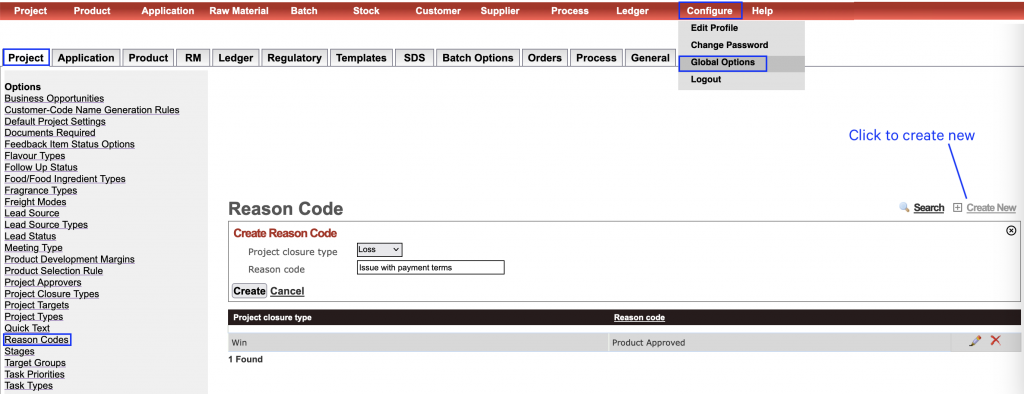
Reason Codes
- To configure reason code go to Configure => Global Options => Project => Reason Codes
Click create new.
Select the project closure type and enter a reason.
Click create.
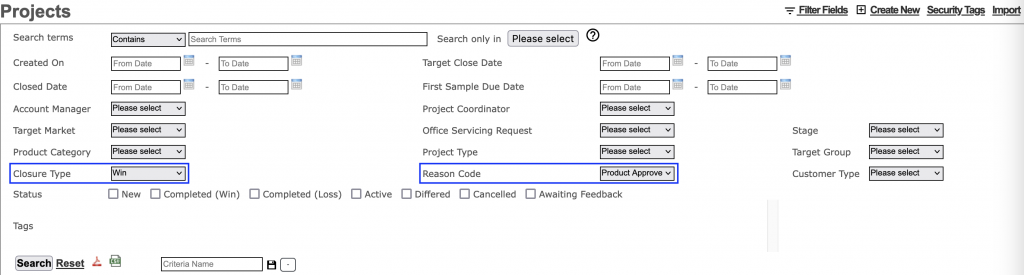
Searching for projects
- To search for projects go to Projects => Search
You can use project closure types and reason codes to narrow down the search.
Alternate workflow
You can configure Ruby to have different workflows. For more on this CLICK HERE.
Resubmitting samples
You can resubmit samples against a requirement.
- To do this go to the feedback tab and edit the relevant requirement (you will see the screen shown below)
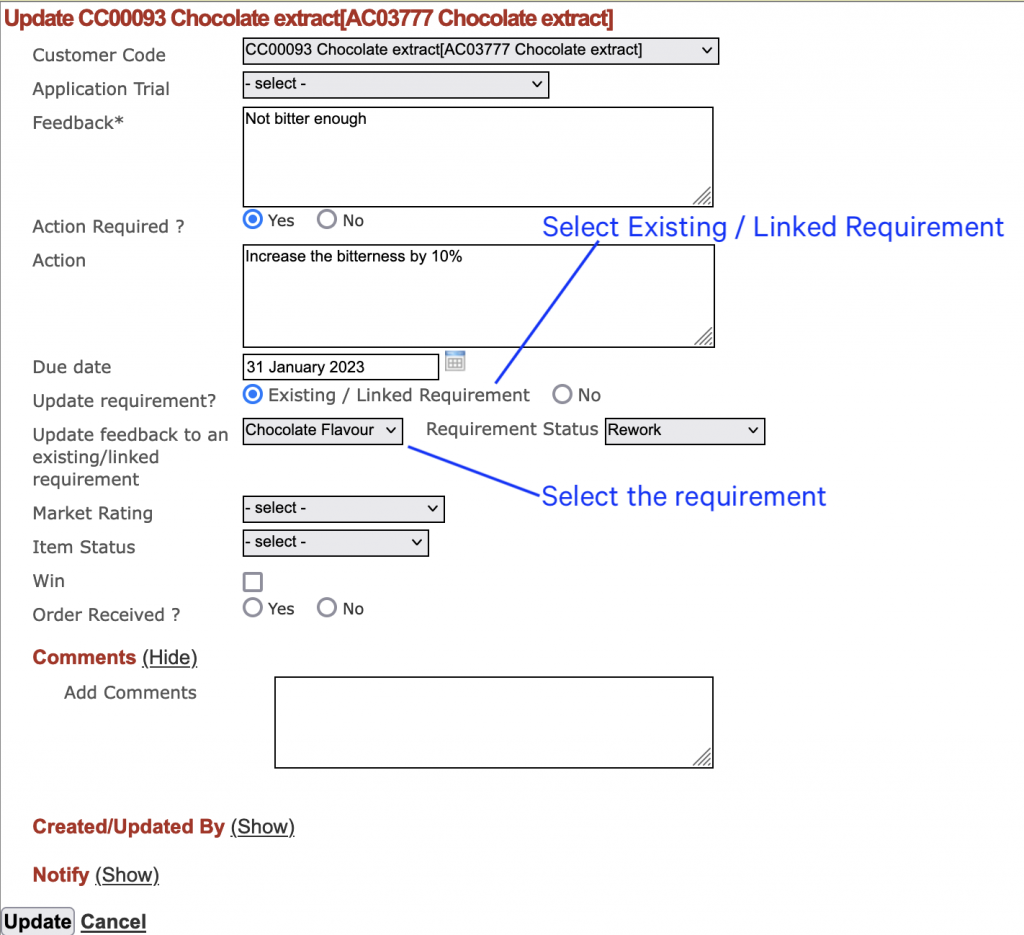
Action Required ? – Select yes
Update requirements? – Select Existing / Linked Requirement
Update feedback to an existing/linked – Select the relevant requirement from the dropdown
Requirement Status – This can be configured in Configure => Global Options => Project => Project Status Options
Item Status – This can be configured in Configure => Global Options => Project => Feedback Item Status Options
Click update, go to the requirement tab and click refresh.
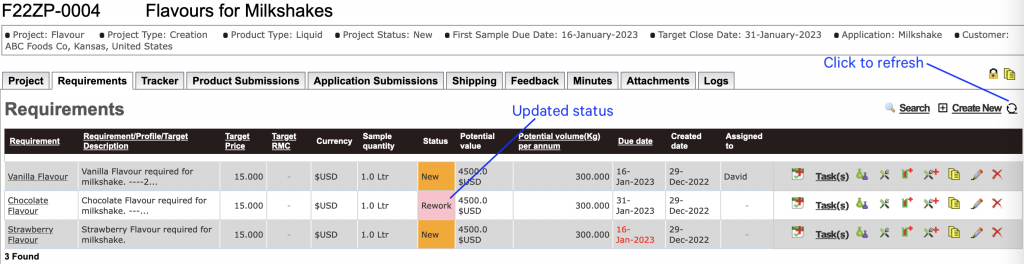
Notice that the status has changed to rework.
Now you can add a new task to resubmit the sample and then repeat the process till feedback and project closure.
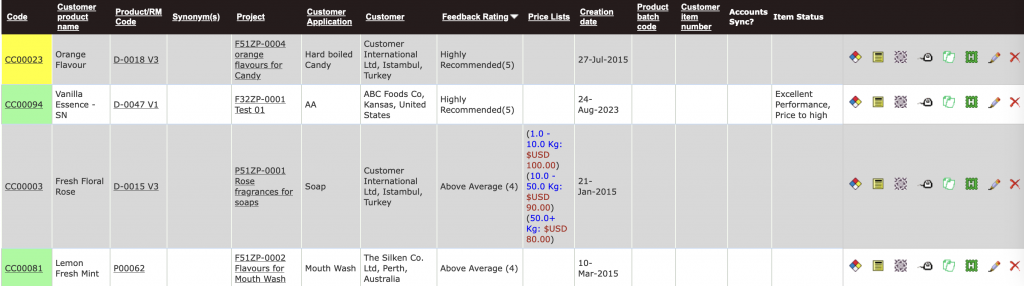
Searching customer feedbacks
- To search for customer feedback’s on samples sent go to Product => Customer Code
To narrow the search down you can use feedback ratings, wins and/or item status.

On clicking search you will see the below screen. Here you can see the the feedback rating, item status and wins.
Item status
- To configure item status go to Configure => Global Options => Project => Feedback Item Status Options
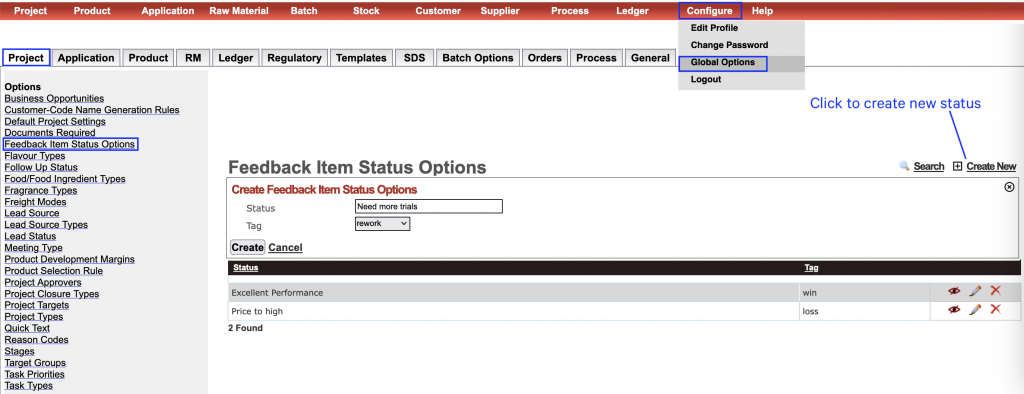
Enter the status and make sure to select the tag.
Other features
Default settings
When you create a new project you can configure the default options to be selected. For instance if your company manufactures only flavours then you can configure the system to always select flavour.
- To do this go to Configure => Global Options => Project => Default Project Settings
Customising forms
Ruby allows you to configure the data you need to capture under projects. This is done for the following tabs :-
Project – Create
Project – Requirement(Create Another)
Project – Update
Requirement – Create
Requirement – Update
- To customise forms go to Configure => Global Options => General => Customize Forms
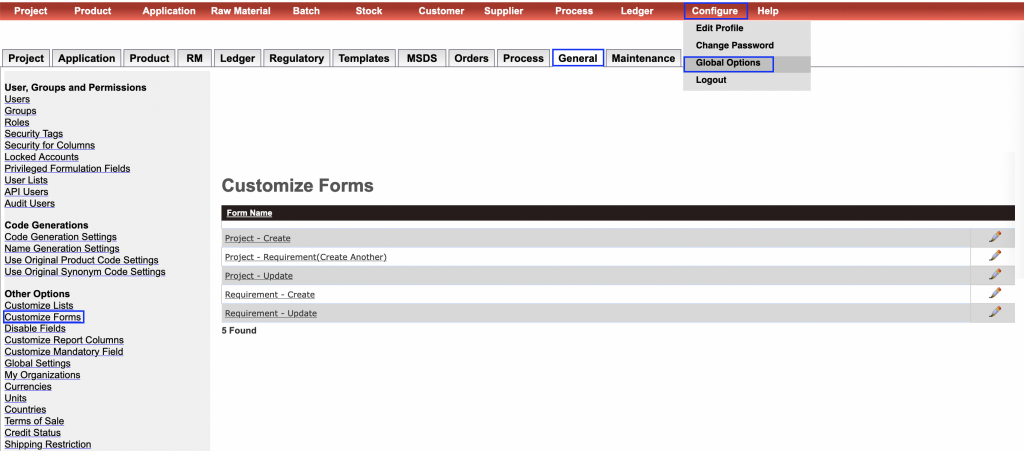
Click edit and you will be taken to the screen shown below.

Default forms
Navigate to default forms and click create new or edit.

Serial No
Enter the position where this section needs to be displayed.
Heading name
Enter a heading name for this section.
Default hide mode
Check this box to collapse the section by default.
Column Name
Select the fields to display from the drop down.
Position
Enter the position where this property needs to be displayed.
Display name
You can override the column name by entering a different name here.
Description
Any text entered here will display in small grey text as the description.
Condition based forms
Condition based forms are used to display properties based on certain conditions.
For example if the project category is flavour, properties such as legal status, flavour type, etc will be displayed AND if the project category is fragrance, properties such as dose rate, fragrance type, etc will be displayed.
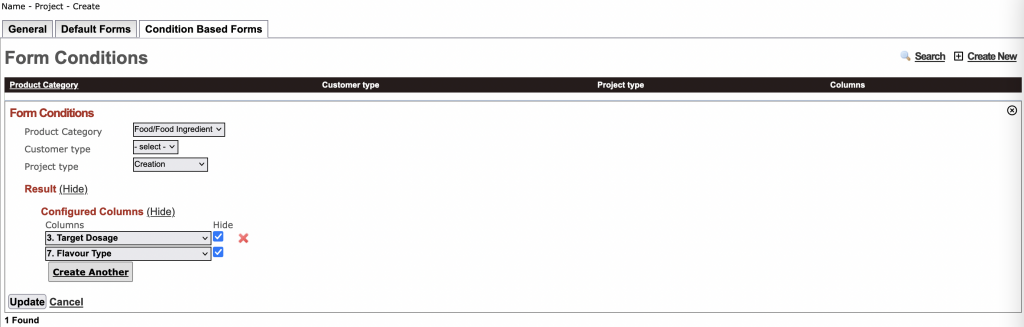
The screen above shows that for product category ‘Food/Food Ingredient’ and project type ‘Creation’, the properties target dosage and flavour type must not be displayed.
Case: Target RMC and Target Prices in Requirements
If your company works of Target price, this is the default. However, you can enable Target RMC via customize forms as explained above under Requirements.
You need to do the following for Requirement(Create Another) as displayed under Project Tab, Requirement(Create) and Requirement(Update).
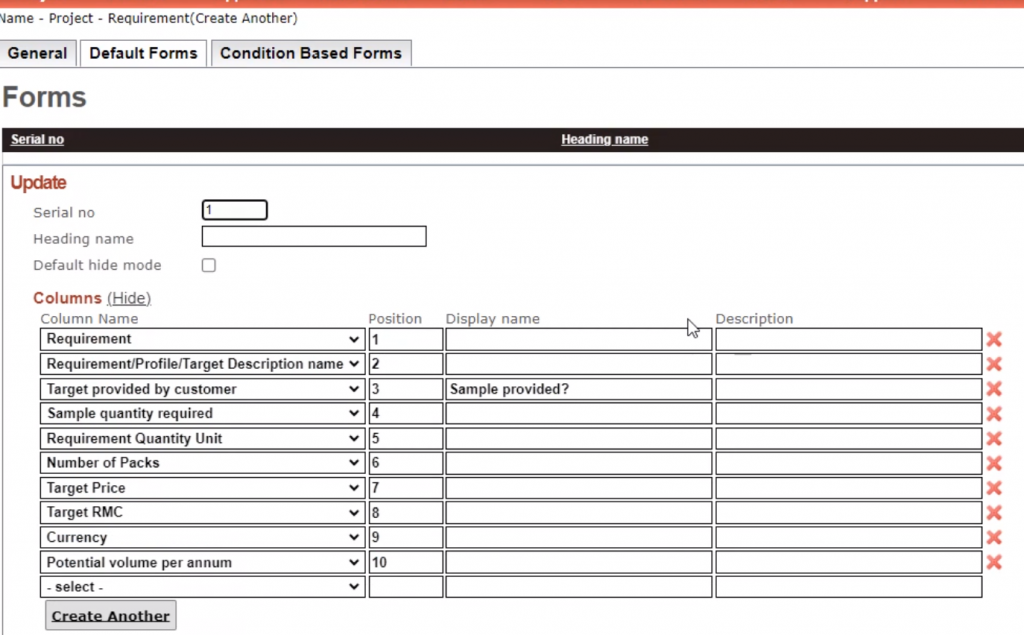
This will also flow through to Tracker.
You also have the option to auto determine RMC from Target price. So, if the account manager enters a target price based on customer requirements, the RMC can be auto calculated using the rules under Global Options => Project => Product Development Margins.

User will need appropriate permissions in Global Options => General => Roles to view either of the fields:

Project approvers
You can restrict projects from moving ahead unless they have been approved. To do this you will need to first configure the approvers.
- To configure approvers go to Configure => Global Options => Project => Project Approvers
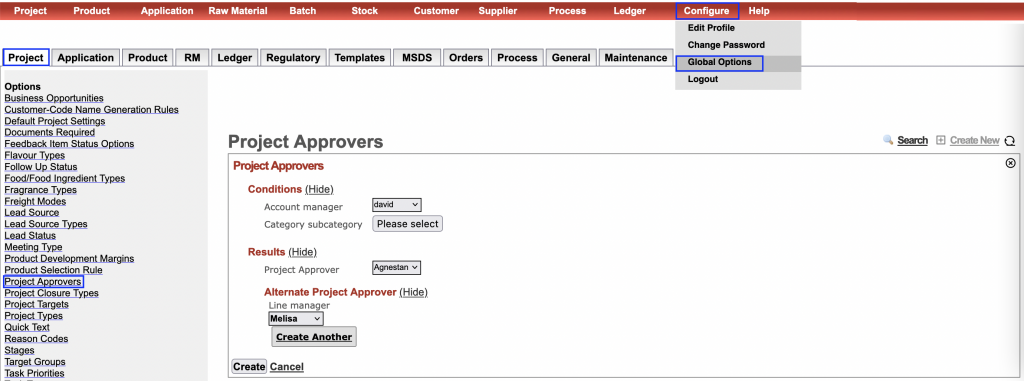
Account managers can be configured in user lists as mentioned earlier in the document.
- To configure project approver AND alternate project approver go to Configure => Global Options => General => User Lists => Project Approver
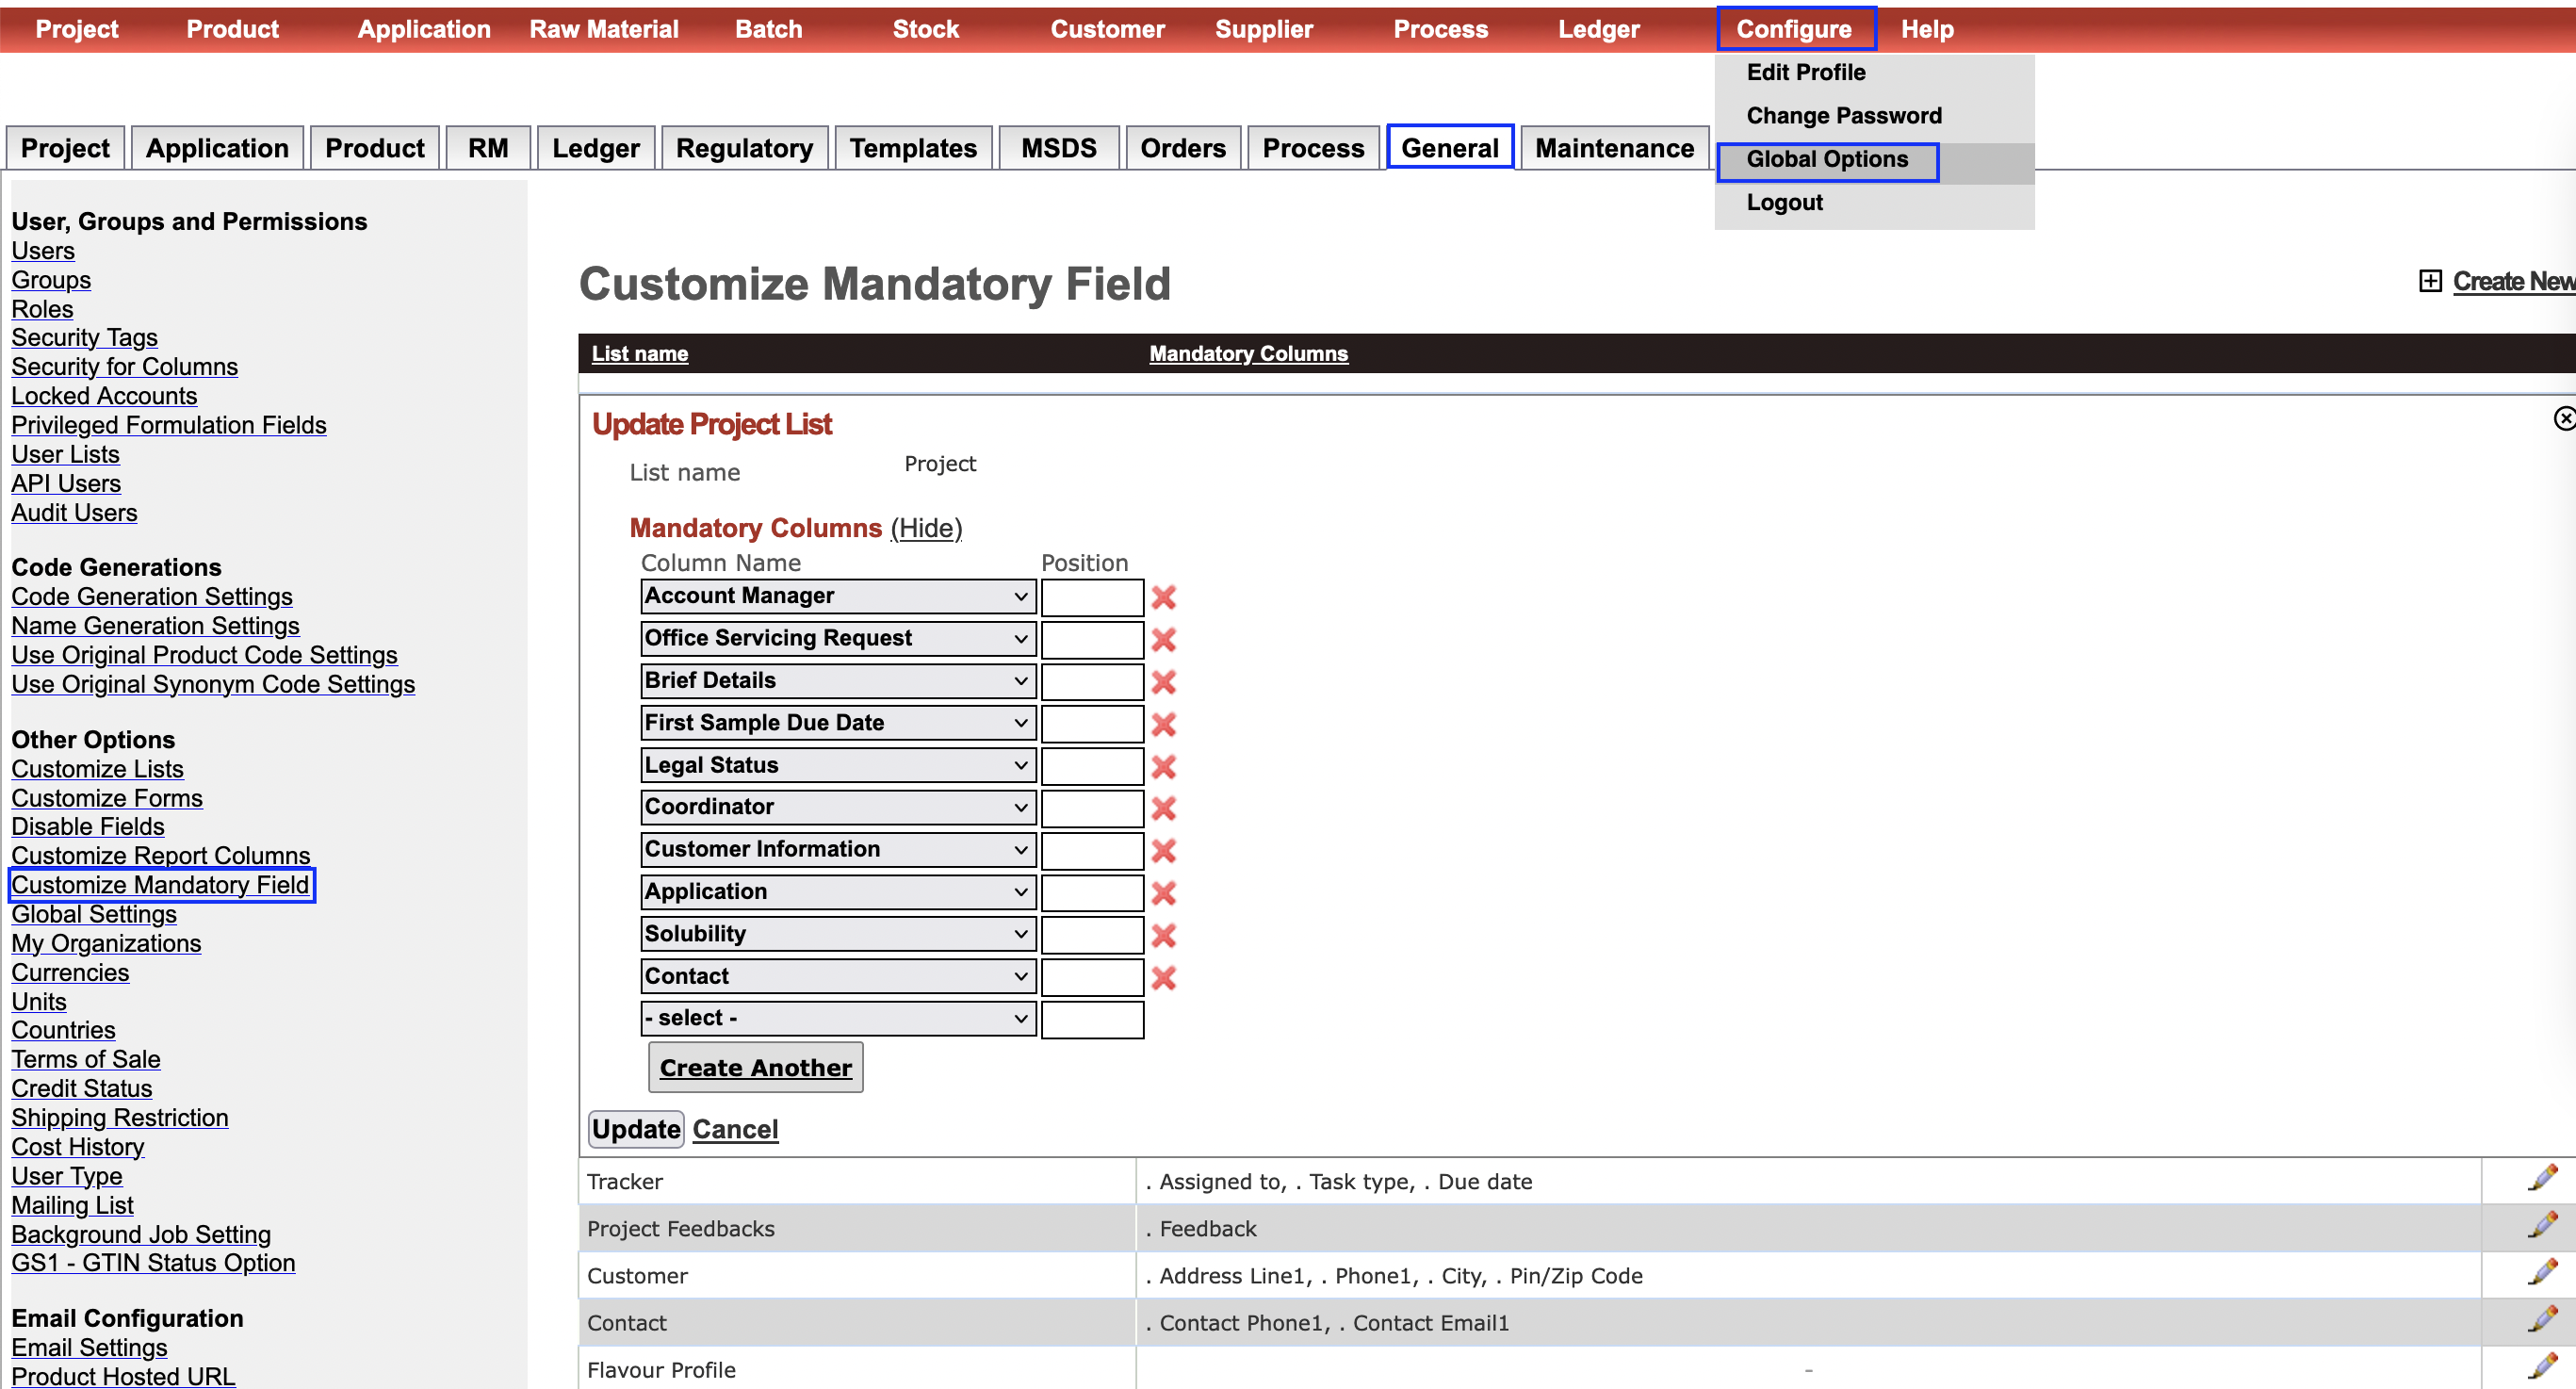
Mandatory properties
You can choose the data that has to be entered (mandatory) by the user. This feature is available across modules.
To configure the mandatory properties go to Configure => Global Options => General => Customize Mandatory Field
Auto status change
Auto status change allows the status of a project, requirements and tracker to change automatically when a record is updated.
- To configure this go to Configure => Global Options => Project => Auto Status Change Rules
This is best explained through examples:
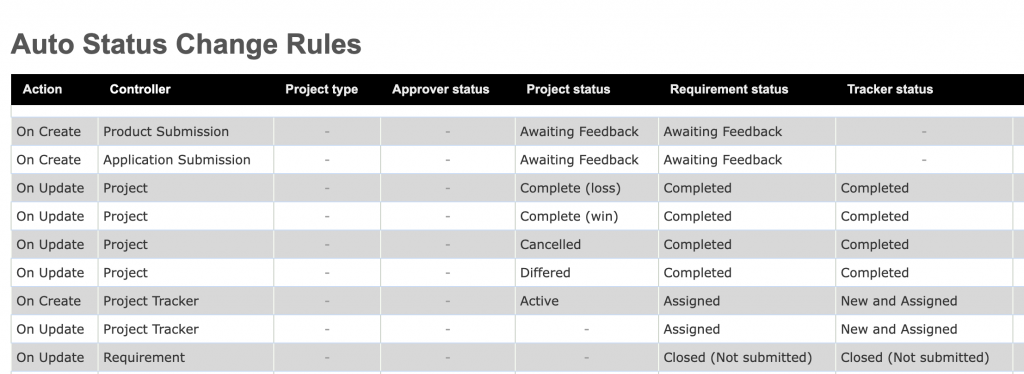
- On Create > Product Submission >> AUTO CHANGE STATUS OF CORRESPONDING RECORDS >> Awaiting Feedback > Awaiting Feedback: On submitting a product, change the status of the project and requirement to ‘Awaiting feedback’
- On Create > Application Submission >> AUTO CHANGE STATUS OF CORRESPONDING RECORDS >> Awaiting Feedback > Awaiting Feedback: Same as above, but applies when submitting an application to the project.
- On Update > Project > Complete (loss) >> AUTO CHANGE STATUS OF CORRESPONDING RECORDS >> Completed > Completed: When the project status is set to completed, then auto change the status of the all its requirements and tasks to completed. (The status should be tagged as CLOSED so it is no longer visible in active lists).
- On Update > Project > Complete (win) >> AUTO CHANGE STATUS OF CORRESPONDING RECORDS >> Completed >> Completed: Same as above
- On Update > Project > Cancelled >> Completed >> AUTO CHANGE STATUS OF CORRESPONDING RECORDS >> Completed: Same as above
- On Update > Project > Differed >> Completed >> AUTO CHANGE STATUS OF CORRESPONDING RECORDS >> Completed: Same as above
- On Create > Project Tracker >> Active > Assigned >> AUTO CHANGE STATUS OF CORRESPONDING RECORDS >> New and Assigned: When you create a tracker, and the status of the tracker is ‘New and Assigned’, then change the status of the project to Active and project requirement to Assigned. This is not affected when Ruby auto creates default tasks on requirement create. Note: The status of the task has to be set to ‘New and Assigned’ by the user.
- On Update > Project Tracker >> Assigned >>AUTO CHANGE STATUS OF CORRESPONDING RECORDS >> New and Assigned: When a tracker is updated with status ‘New and Assigned’ the corresponding requirement status changes to Assigned. Note: The status of the task has to be set to ‘New and Assigned’ by the user.
- On Update Requirement > Closed (Not submitted) >> AUTO CHANGE STATUS OF CORRESPONDING RECORDS >> Closed (Not submitted): When the requirement status is changed to Closed (Not submitted), the corresponding tracker tasks are auto changed to ‘Closed (Not submitted)’.
Auto status change with project approvers

The above configuration is applicable in the project approver workflow.
The first rule states that if a project does not require an approver (Approval not selected for the project) the project status auto changes to Approved. Though the requirement status is set as New it will have no impact.
The second rule states that if a task status is set to ‘assigned’ when creating a task, then auto change the project status to Work in progress if the Approver status to APPROVED. Project approver status only works in project controller context as follows:

The third rule states that if a project requires approval (project approver selected in the project), the project status will be auto set to pending Approval.
Forth rule. The requirement status configured is not relevant. If the project approver status changes to approved, then auto change the project status to approved.
The fifth rule states that if user changes the project approver status to Rejected, then auto change the status of project rejected. The requirement and tracker status will not change even though it is configured here. To trigger this change another rule is required.
Auto status change – other triggers

Rule 1 states that when all the requirements are shipped, then auto change the project status to Awaiting feedback.
Rule 2 states that when all the requirement status change to Awaiting feedback, then auto change the project status to Awaiting feedback.
Rule 3 states if a new project is created with project type as sampling, then set the default status to Ready to sample.
Manage Tasks
Use this screen to view and manage tasks.
- For security reasons, only a project coordinator can view tasks.
- The project coordinator can view tasks, only of his projects.
- If the user is not a project coordinator then he needs to be a part of a group, to view all the tasks of the users of that group.
Creating a group
- To create a group go to Configure => Global Options => General => Groups
Click create new (You can create a group for each team).
Enter a name and select the users.
Give view permissions as shown below and click create.
Searching for tasks
- Go to Project => Manage Task
Check Include task of other coordinators in my group and click search.
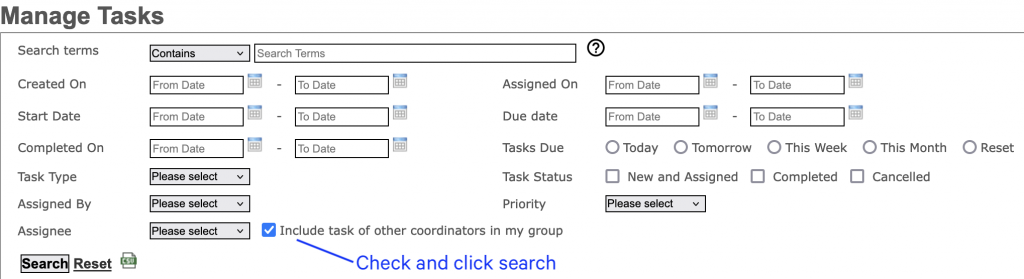
You will be able to see the tasks of members of your group.
Note: All projects of the group members will also be visible to all members of the group.